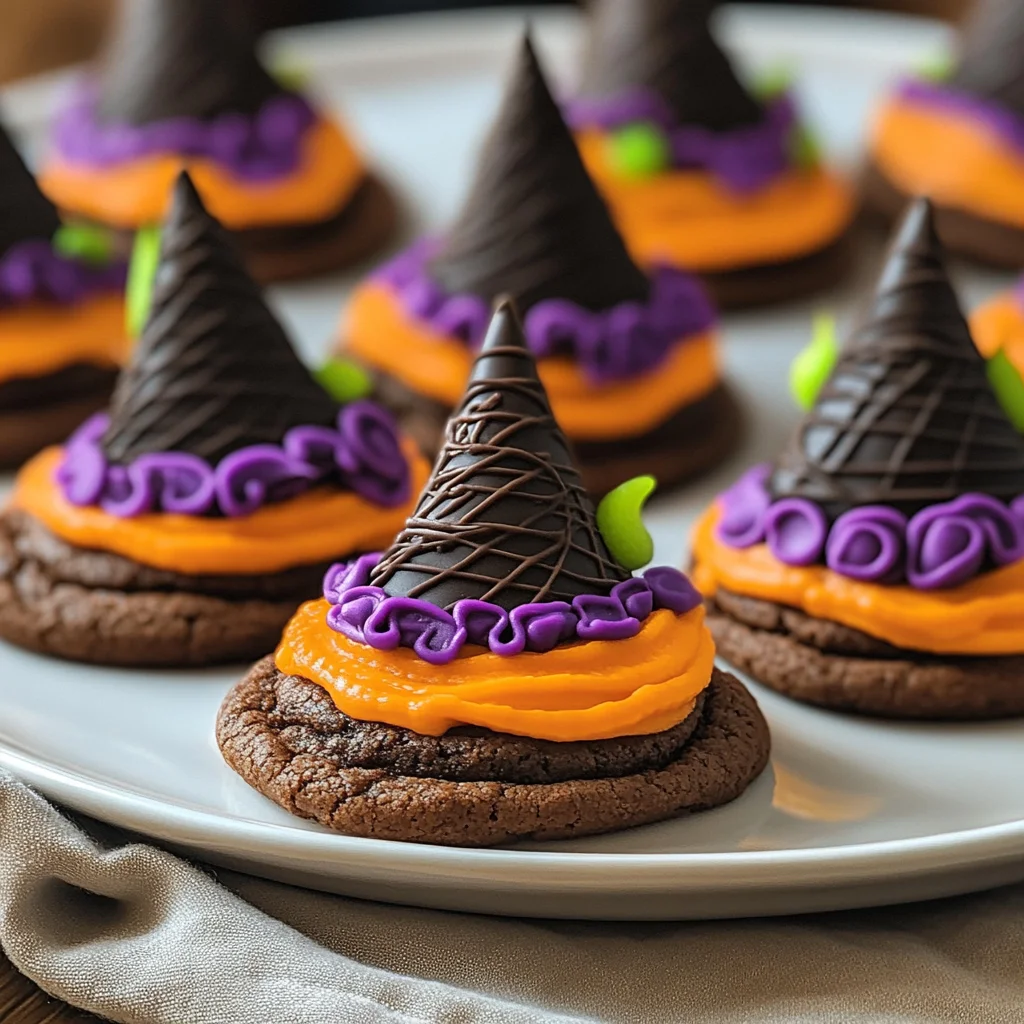
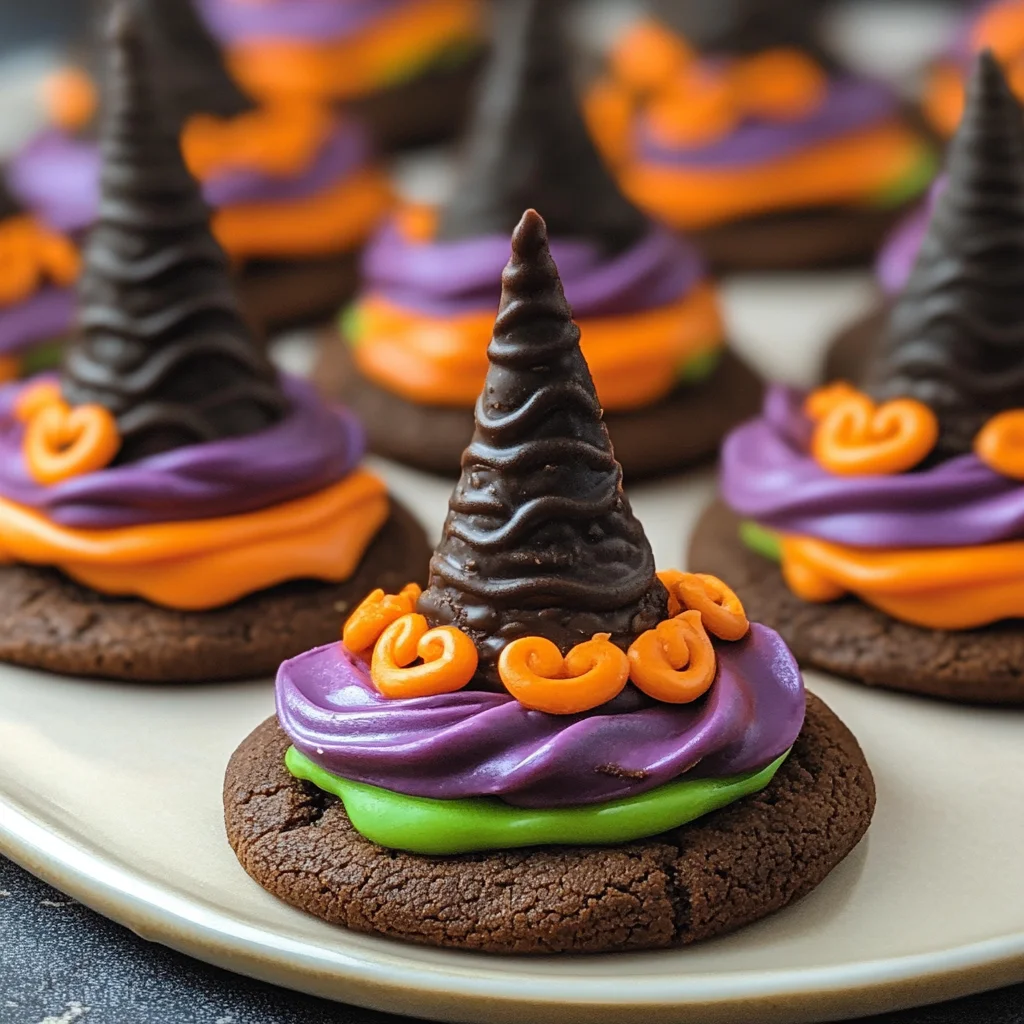
Halloween Witch Hat Cookies
These Halloween Witch Hat Cookies are a delightful treat that will enchant your guests at any Halloween gathering. With their whimsical design and chocolaty goodness, they make for a fun baking project with kids. Not only are these cookies visually impressive, but they also allow for creative customization, ensuring every batch is uniquely yours.
Why You’ll Love This Recipe
- Easy to Make: With simple steps and common ingredients, even novice bakers can whip these up with ease.
- Fun for Kids: A great activity to engage children in the kitchen while getting them excited for Halloween.
- Customizable Designs: Feel free to get creative with colors and decorations to make each cookie stand out.
- Perfect for Parties: These cookies are sure to be a hit at Halloween parties, showcasing both fun and flavor.
- Deliciously Chocolaty: The combination of chocolate cookies and cake adds richness that everyone will love.
Tools and Preparation
Before diving into the recipe, gather your essential tools. Having everything on hand will make the process smoother and more enjoyable.
Essential Tools and Equipment
- Cupcake Cones Baking Rack
- Baking Sheet
- Parchment Paper
- Decorating Bags (with tips)
- Mixing Bowls
- Knife (for trimming)
Importance of Each Tool
- Cupcake Cones Baking Rack: This tool allows you to bake your sugar cones upright, ensuring an even rise and perfect shape.
- Decorating Bags: Using specific tips helps create beautifully piped icing designs that elevate your witch hat cookies.
Ingredients
For the Cake Base
- Favorite Cake Mix or Try Wilton’s Chocolate Cake Recipe
For the Cookie Base
- Store Bought Chocolate Cookies or Try This Recipe from Wilton
For Coloring the Icing
- Lemon Yellow Icing Color
- Black Color Mist Food Coloring Spray
- Rose Icing Colors Pink Food Coloring
- Violet Icing Color, Gel Food Coloring
- Golden Yellow Icing Color
- Orange Icing Color
For Assembly
- Sugar Cones
- Creamy White Decorator Icing, 4 lb. Tub
How to Make Halloween Witch Hat Cookies
Step 1: Prepare & Bake the Cones
- Prepare the cake mix following the chosen recipe’s instructions.
- Place the Cupcake Cones Baking Rack on the cookie sheet.
- Insert the sugar cones into the rack and fill each cone with about 2 tablespoons of cake batter.
- Bake according to your chosen recipe’s timing instructions and let cool afterward.
Step 2: Spray the Cones
- If necessary, trim any risen cake level with the top of the cone using a knife.
- Place cones wide side down on parchment paper.
- Using Black Color Mist, spray all over the cones until fully covered.
- Allow them to dry for about 10 to 15 minutes.
Step 3: Tint the Icing & Prepare the Bags
- Tint 1 cup of creamy white decorator icing orange.
- Combine violet and rose icing colors to tint another cup purple.
- Prepare two decorating bags with tip 2B; fill these with orange and purple icing respectively.
- In a separate bowl, tint ¼ cup of creamy white decorator icing yellow by mixing golden yellow and lemon yellow icing colors; place it in a bag fitted with tip 3.
Step 4: Assemble the Witch Hats
- Pipe a small amount of orange icing in the center of each chocolate cookie; place a cone on top.
- For half of your cones, pipe a band around their wide ends using smooth side facing out; smooth using a spatula if needed.
- Repeat this process with purple icing on the remaining cookies and cones.
- Let set for about 15 to 20 minutes before piping a yellow buckle around each hat’s band using tip 3.
- Allow another set time of 15 to 20 minutes before serving.
Enjoy your spooky creations!
How to Serve Halloween Witch Hat Cookies
These Halloween Witch Hat Cookies are a delightful treat that can be served in various fun and festive ways. Whether for a Halloween party or a spooky movie night, here are some serving suggestions to make your treats even more special.
Cookie Display
- Use a decorative platter to present the cookies. Arrange them in clusters for an eye-catching display.
- Add some fake spider webbing or plastic spiders around the cookies to enhance the Halloween theme.
Party Favors
- Package individual cookies in clear bags tied with orange ribbons. This makes for a cute and tasty party favor for your guests.
- Include a small card with a fun Halloween message or recipe link for added charm.
Themed Dessert Table
- Incorporate these cookies into a larger themed dessert table. Pair them with other Halloween treats like pumpkin cupcakes or ghostly marshmallows.
- Use black and orange tableware to match the festive spirit of the occasion.
Interactive Decorating Station
- Set up a decorating station where guests can customize their own witch hats with additional icing and edible decorations.
- Provide various toppings, such as sprinkles or candy eyes, for extra fun!
How to Perfect Halloween Witch Hat Cookies
To ensure your Halloween Witch Hat Cookies turn out perfectly every time, follow these helpful tips that will elevate your baking game.
- Choose Quality Ingredients: Opt for high-quality cake mix and icing colors for vibrant flavors and colors.
- Use Fresh Icing: Make sure your decorator icing is freshly made or well-stored so it pipes smoothly.
- Keep Cones Dry: Ensure the sugar cones are completely dry before spraying them with color mist to achieve an even coat.
- Practice Piping Techniques: If you’re new to piping, practice on parchment paper first to build confidence and get the right flow.
- Allow Proper Setting Time: Be patient during setting times; this helps the icing harden properly and retains its shape when handled.
Best Side Dishes for Halloween Witch Hat Cookies
Pairing side dishes with your Halloween Witch Hat Cookies can create a well-rounded dessert experience. Here are some great options that complement these sweet treats.
- Pumpkin Soup: A warm, creamy soup made from fresh pumpkin adds seasonal flavor that’s perfect for fall gatherings.
- Spooky Cheese Platter: Include assorted cheeses shaped like bats or ghosts, along with crackers for a savory contrast to the sweetness of the cookies.
- Witch’s Brew Punch: A refreshing non-alcoholic punch made with fruit juices and soda that adds a festive touch without any alcohol.
- Crispy Veggie Tray: Fresh vegetables served with a spooky-themed dip can provide a crunchy contrast and balance out the sweets.
- Ghostly Fruit Skewers: Assemble skewers of fruit shaped like ghosts using bananas and mini chocolate chips for eyes—healthy and fun!
- Mummy Hot Dogs: Wrap hot dogs in crescent roll dough to create mummies; bake until golden brown for a playful savory treat.
- Candy Corn Jell-O Cups: Layered Jell-O cups mimic candy corn colors, adding both visual appeal and sweetness to your dessert spread.
Common Mistakes to Avoid
When making Halloween Witch Hat Cookies, it’s easy to make a few common errors. Here are some tips to help you avoid them.
-
Ignoring the baking time: Always follow the recommended baking time for your cake mix or cookie recipe. Overbaking can lead to dry cookies that crumble easily.
-
Skipping the cooling step: Let your cake cones cool completely before applying any icing. If not cooled, the icing may melt and ruin your witch hats.
-
Using incorrect food coloring: Make sure you use gel or mist food coloring specifically designed for decorating. Liquid food coloring can alter the consistency of your icing.
-
Not preparing enough icing: It’s better to prepare more icing than you think you’ll need, as running out mid-decorating can be frustrating.
-
Rushing assembly: Take your time when piping the icing and assembling the witch hats. A steady hand will yield more visually appealing cookies.
Storage & Reheating Instructions
Refrigerator Storage
- Store cookies in an airtight container.
- They can last up to 5 days in the refrigerator.
Freezing Halloween Witch Hat Cookies
- Wrap cookies tightly in plastic wrap and place them in a freezer-safe container.
- They can be frozen for up to 3 months.
Reheating Halloween Witch Hat Cookies
- Oven: Preheat to 350°F (175°C) and warm cookies for about 5-7 minutes.
- Microwave: Heat one cookie at a time for about 10-15 seconds on medium power.
- Stovetop: Place a pan over low heat and warm cookies for about 1-2 minutes, turning occasionally.
Frequently Asked Questions
Here are some frequently asked questions regarding Halloween Witch Hat Cookies.
Can I use a different type of cake mix?
Yes! You can use any flavor of cake mix you prefer, such as vanilla or red velvet, to create unique variations of Halloween Witch Hat Cookies.
How do I make my icing thicker?
To achieve a thicker consistency, add more powdered sugar gradually until you reach your desired thickness. This will help it hold its shape when piping.
What can I use instead of sugar cones?
If you can’t find sugar cones, try using waffle cones. They provide a similar shape and texture for your witch hat cookies.
How do I decorate these cookies?
You can customize your decorations with different colored icings, sprinkles, or edible glitter to make each cookie unique!
Are these cookies suitable for kids?
Absolutely! Making Halloween Witch Hat Cookies is a fun activity that kids will enjoy. Just supervise them while decorating!
Final Thoughts
These Halloween Witch Hat Cookies are not only delightful but also offer endless customization options. Whether you’re hosting a party or just want a fun family project, these treats will surely impress everyone. Try experimenting with different colors and designs to create your own spooky masterpieces!
Halloween Witch Hat Cookies

Create a magical Halloween experience with these enchanting Halloween Witch Hat Cookies! Perfect for parties or family gatherings, these whimsical treats feature a delightful combination of chocolate cookies and cake. Easy to make and customizable, they’re a fantastic way to engage kids in the kitchen while getting into the Halloween spirit. Decorate with vibrant icing colors to create unique witch hats that are sure to impress your guests. Whether displayed on a festive platter or packaged as party favors, these cookies will add a touch of fun and flavor to your Halloween celebrations.
- Prep Time: 20 minutes
- Cook Time: 15 minutes
- Total Time: 35 minutes
- Yield: Makes about 12 cookies
- Category: Dessert
- Method: Baking
- Cuisine: American
Ingredients
- Cake mix (your favorite brand)
- Sugar cones
- Chocolate cookies (store-bought or homemade)
- Creamy white decorator icing
- Food coloring (various colors)
Instructions
- Preheat oven and prepare cake mix according to package instructions.
- Place sugar cones upright in a baking rack and fill with cake batter.
- Bake until done, then cool completely.
- Trim any excess cake from the cones and spray with black color mist.
- Tint decorator icing with desired colors (orange, purple, yellow).
- Assemble by piping icing onto chocolate cookies and placing cones on top.
- Decorate with additional icing details as desired.
Nutrition
- Serving Size: 1 cookie (50g)
- Calories: 150
- Sugar: 12g
- Sodium: 120mg
- Fat: 5g
- Saturated Fat: 2g
- Unsaturated Fat: 3g
- Trans Fat: 0g
- Carbohydrates: 25g
- Fiber: 1g
- Protein: 2g
- Cholesterol: 0mg